Getting your RemoteIoT setup to chat with the outside world, especially when it's tucked away behind a firewall on a Mac server, can seem like a bit of a puzzle. Many folks wonder how to make their smart devices reach out without leaving their network open to just anyone. It's a common situation, really, and something many people want to figure out for their connected devices.
When you've got a Mac acting as your central hub for RemoteIoT, and then a firewall standing guard, it means you need a thoughtful approach. You want your devices to connect and share information, but you also want to keep everything safe. It's about finding that just-right balance, you know, between accessibility and keeping your digital space secure.
This write-up will walk you through the ways to achieve this, helping you understand the pieces involved. We will look at how to get your RemoteIoT talking, even with that protective barrier in place, all while using your Mac server as the core. It's pretty much about making sure your signals get where they need to go without causing trouble.
Table of Contents
- Why Does a Firewall Make Things Tricky for RemoteIoT?
- Getting Ready - What You Need to Know
- How Do We Let RemoteIoT Through the Firewall?
- Setting Up Your Mac Server for RemoteIoT Access
- Are There Other Ways to Connect RemoteIoT?
- What If Things Don't Work?
Why Does a Firewall Make Things Tricky for RemoteIoT?
A firewall, you see, acts like a security guard for your home network. It checks everything trying to come in or go out, making sure only approved traffic gets through. This is really good for keeping unwanted visitors out, obviously, like folks trying to sneak onto your personal computers or devices.
The issue arises when your RemoteIoT devices, which are meant to communicate with things outside your home, try to send or receive data. The firewall, doing its job, might just block these attempts because it doesn't recognize them as allowed. It's kind of like trying to get a delivery through a locked gate without telling the guard it's coming, you know?
This protective barrier is there for a good reason, to be honest. It's a way to keep your private information and systems safe from bad actors on the internet. So, while it can seem like a hurdle for your IoT plans, its presence is actually a benefit for your overall security posture.
When we talk about getting your RemoteIoT to work, we're essentially talking about giving the firewall specific instructions. We need to tell it, "Hey, this particular kind of data, from this specific device, is okay to let through." That's the basic idea behind making it all work, actually.
The role of a firewall when you want to use remoteiot behind firewall using mac server
A firewall's main job is to filter network traffic. It decides what gets in and what goes out based on rules you or your internet provider set. For your Mac server, this means it has its own built-in firewall, plus you might have another one from your router. So, there are potentially two layers of protection, which is pretty common.
When you want to use remoteiot behind firewall using mac server, these filters can stop your data from reaching its destination. Your IoT devices might send out signals, but if the firewall doesn't have a rule for those signals, it just drops them. It's a bit like trying to call someone, but their phone is set to block unknown numbers, you know?
The rules a firewall uses are often based on "ports" and "IP addresses." Think of ports as specific doors on a building, and IP addresses as the building's street address. For your RemoteIoT to work, you need to open the right doors at the right addresses. That's what we'll be looking at, definitely.
Understanding these basic parts of how a firewall operates is a big first step. It helps you see why things might not be connecting right away and what you need to adjust. It's not about getting rid of the firewall, but rather about teaching it to let your RemoteIoT traffic pass through, more or less, without weakening your overall protection.
Getting Ready - What You Need to Know
Before you start making changes, it's a good idea to gather some information. Knowing what you're working with makes the whole process smoother. This includes details about your network and the RemoteIoT setup itself. It's just like preparing your tools before starting a project, really.
You'll want to know the IP address of your Mac server. This is its unique identifier on your local network. You'll also need to know which ports your RemoteIoT devices or software prefer to use for communication. These are like the specific channels they broadcast on. This information is pretty important, you know, for setting things up correctly.
It's also helpful to have access to your router's settings. Your router often has its own firewall, separate from your Mac's. You might need to make adjustments there too. Having the login details for your router's administration page will save you time later. It's a good habit to keep these details somewhere safe, actually.
Lastly, make sure your RemoteIoT devices are powered on and connected to your network. You can't test if they're talking to the outside world if they aren't even talking to your local network. A simple check of their status lights or companion apps can confirm this. This preparation really helps avoid frustration down the line.
Checking your Mac server setup for how to use remoteiot behind firewall using mac server
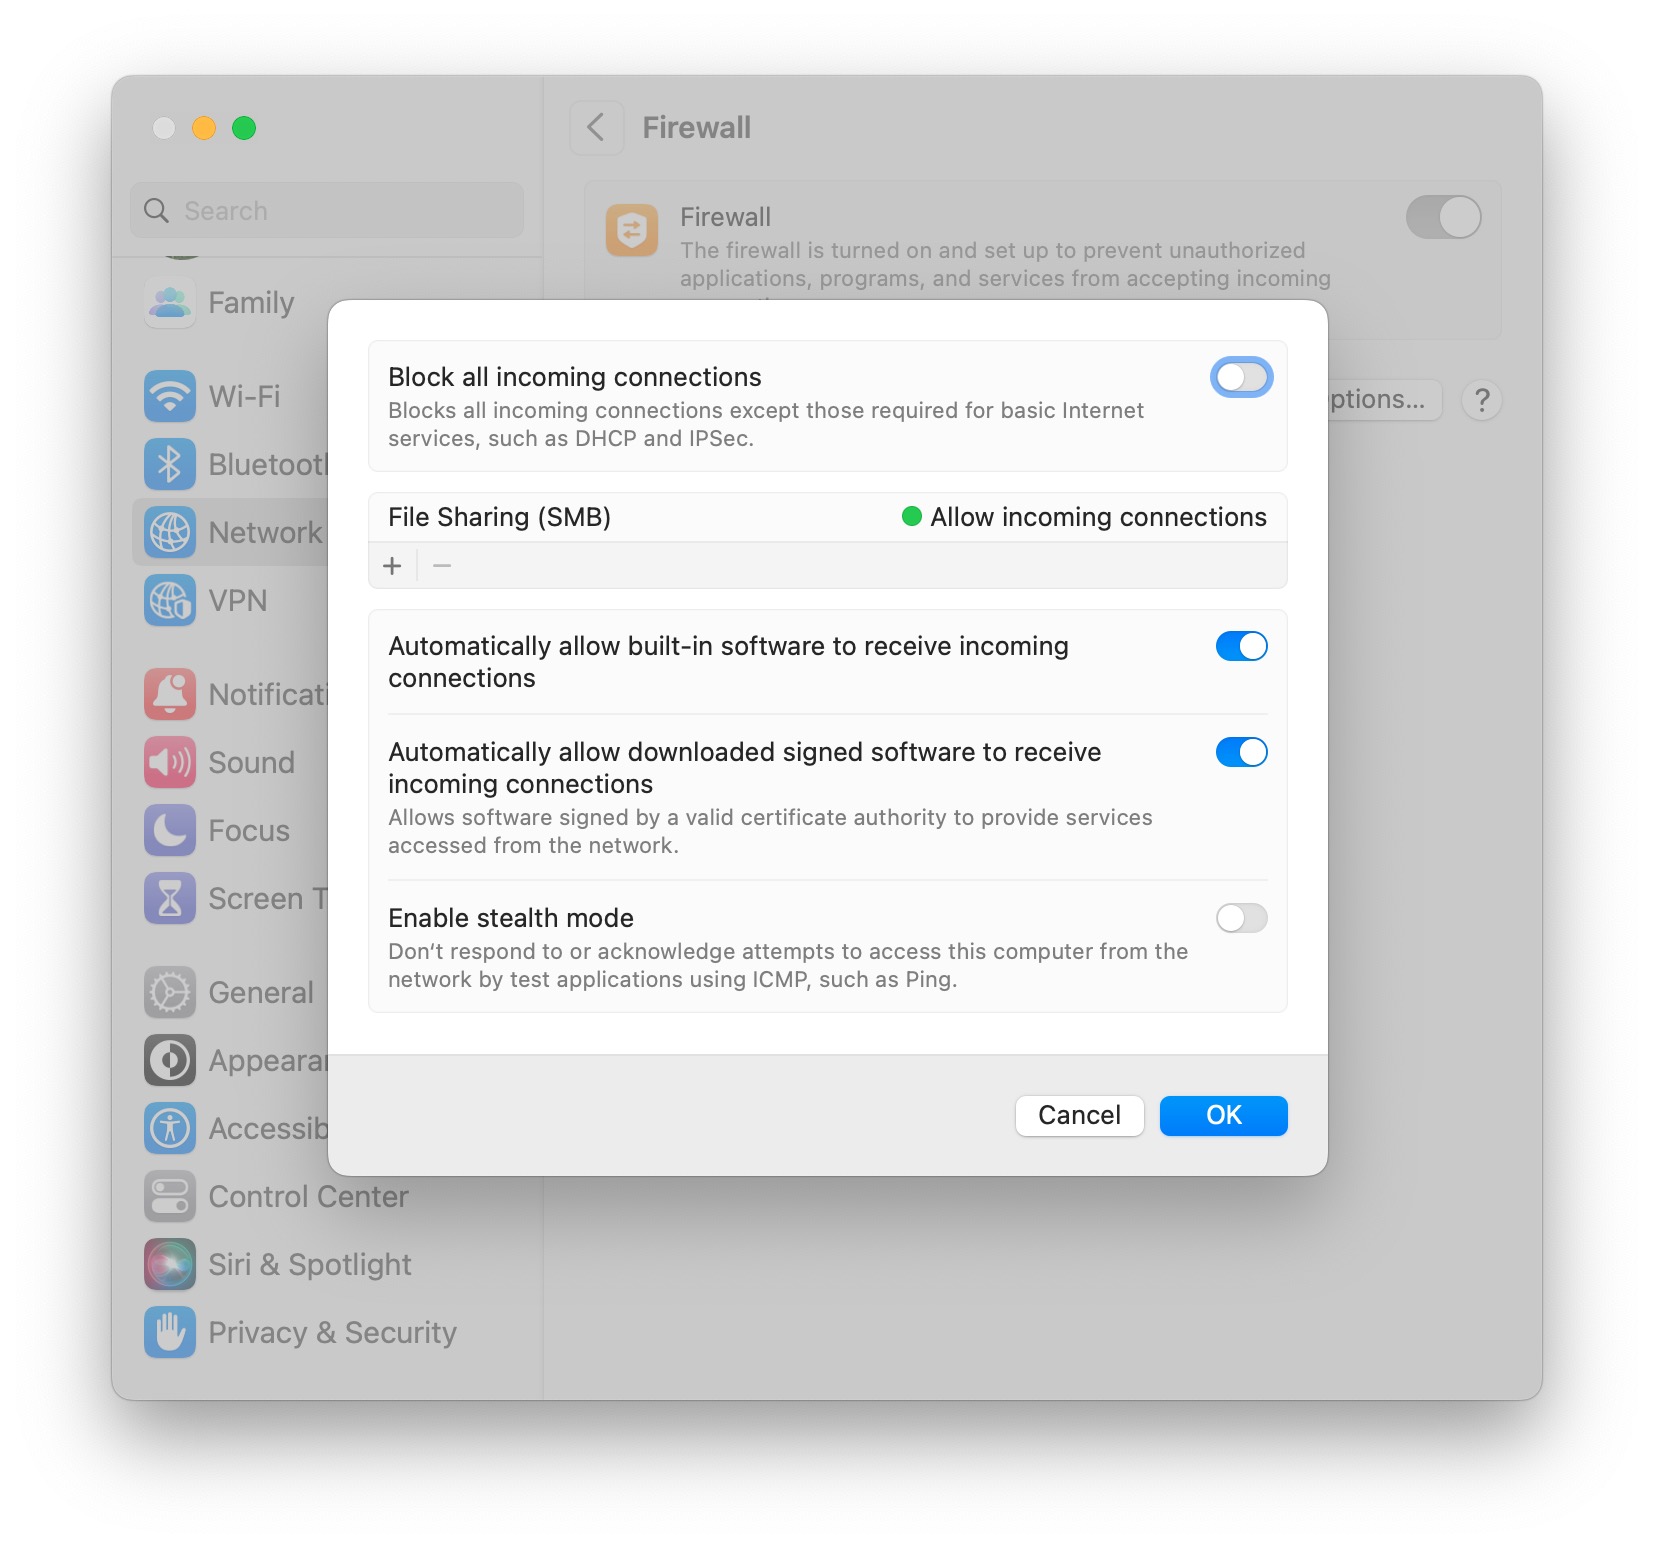
Your Mac server's setup is a key piece of this puzzle. First, check its own firewall settings. On a Mac, you can usually find these in System Settings (or System Preferences, depending on your macOS version), under "Network" or "Security & Privacy." Look for "Firewall." You want to see if it's turned on, which it probably is, and what rules it has in place. This is a pretty straightforward check, honestly.
When you want to use remoteiot behind firewall using mac server, you might need to add specific applications or services to your Mac's firewall exceptions list. This tells your Mac's firewall that traffic from these particular programs is okay to send or receive. It's like giving a special pass to certain people at your gate. You can usually click a plus sign to add an application, then find the RemoteIoT software you're using.
Also, confirm your Mac server has a static IP address on your local network. If its IP address changes often, your firewall rules might stop working. You can usually set this up in your Mac's network settings, under TCP/IP, or by configuring your router to always give your Mac the same IP. This makes things much more stable, you know?
Make sure your Mac server is running the necessary RemoteIoT software and that it's up to date. Outdated software can sometimes have issues communicating or might not play nice with newer firewall settings. A quick check for updates can often fix small connection glitches before they become big problems. It's a simple step, but definitely worth doing.
How Do We Let RemoteIoT Through the Firewall?
The main way to let your RemoteIoT signals pass through a firewall is by opening specific "ports." Think of these ports as numbered doors on your network. Most firewalls are set up to keep all doors closed unless you tell them otherwise. Your RemoteIoT system needs certain doors open to send and receive its information. This is a pretty common step for many network setups, actually.
This process is often called "port forwarding" when done on your router, or "adding a firewall rule" when done on your Mac server. Both do a similar job: they tell the firewall, "If you see data trying to go through this specific door, let it pass." It's about creating a clear path for your IoT data, more or less, without opening up your whole network.
You'll need to know which ports your RemoteIoT platform uses. This information is usually found in the documentation for your specific RemoteIoT software or device. Common ports for IoT might be 80 (for web traffic), 443 (for secure web traffic), or other less common ones like 1883 for MQTT, which is a messaging protocol often used by IoT devices. Knowing these numbers is key, obviously.
It's important to only open the ports that are absolutely necessary. Opening too many ports, or the wrong ones, can make your network less safe. We want to be precise here, just like you wouldn't leave every window in your house open all the time. It's about being smart with your access points.
Opening specific pathways for how to use remoteiot behind firewall using mac server
To open these pathways when you want to use remoteiot behind firewall using mac server, you'll typically start with your router. Log into your router's administration page using a web browser. The address is often something like 192.168.1.1 or 192.168.0.1. You'll need the username and password for this. Look for sections labeled "Port Forwarding," "Virtual Servers," or "Firewall Rules." This is where you'll create the new pathways, you know?
Inside the port forwarding section, you'll usually be asked for a few pieces of information. You'll need the "External Port" (the port the outside world uses to reach you), the "Internal Port" (the port your Mac server is listening on), and the "Internal IP Address" (which is the static IP address of your Mac server). You'll also select the "Protocol," which is usually TCP, UDP, or both. This is pretty standard stuff for network adjustments.
For your Mac server's own firewall, the process is a little different. Go to System Settings > Network > Firewall. Here, you might add a rule for the specific RemoteIoT application itself, allowing it to accept incoming connections. Or, you might add a rule for a specific port number if the application isn't listed. This tells your Mac's built-in guard to allow that particular type of communication. It's a straightforward way to give permission, actually.
After you set up these rules, it's a good idea to save the changes on both your router and your Mac. Sometimes, you might need to restart your router for the changes to take effect. Then, you can test if your RemoteIoT devices can now communicate as they should. This is a pretty satisfying step when it all works out, more or less.
Setting Up Your Mac Server for RemoteIoT Access
Once you've adjusted your firewall settings, the next piece involves making sure your Mac server is ready to handle the incoming connections for your RemoteIoT. This isn't just about opening ports; it's about making sure the software on your Mac is listening for those connections and can do something with them. It's pretty important, you know, that the Mac is prepared.
Your RemoteIoT software or server application needs to be running and configured to use the same ports you just opened in your firewall. If your software is set to use port 8080, but you forwarded port 1883, they won't connect. So, double-check that these numbers match up. This is a common point where things can go wrong, honestly, if there's a mismatch.
Sometimes, your Mac server might have other services running that use the same ports, causing a conflict. It's a bit like two different shops trying to use the same front door. You'll need to make sure your RemoteIoT software has exclusive use of the ports it needs, or that it's configured to share them properly if that's an option. This might mean adjusting settings within the RemoteIoT application itself, too.
Consider setting up a dynamic DNS (DDNS) service. Since most home internet connections have IP addresses that change periodically, a DDNS service gives you a consistent web address (like "myhomeiot.ddns.net") that always points to your current home IP. This makes it much easier to access your RemoteIoT from anywhere, as you don't have to keep track of a changing number. It's a really handy thing to have, seriously, for remote access.
Configuring network settings for how to use remoteiot behind firewall using mac server
When you are trying to use remoteiot behind firewall using mac server, configuring its network settings properly is a big part of the deal. We talked about setting a static IP address for your Mac server. This is a foundational step because port forwarding rules on your router rely on that unchanging address. If the Mac's IP shifts, the forwarded traffic won't know where to go. This is a pretty basic networking concept, actually, but it makes a huge difference.
Beyond the IP address, you might need to look at how your Mac handles network services. macOS has built-in sharing options for things like File Sharing, Screen Sharing, or Remote Login. While these are separate from your RemoteIoT application, sometimes they can use ports that conflict or just add to the general network traffic. It's a good idea to only have the services you truly need turned on. This helps keep things tidy and avoids unexpected issues, you know?
For some RemoteIoT setups, especially those that involve web interfaces, you might be running a web server on your Mac. Making sure this web server is configured to listen on the correct port (like 80 or 443) and that it's set to accept connections from outside your local network is key. This usually involves checking the web server's configuration files, like Apache's httpd.conf or Nginx's nginx.conf, if you're using those. It can be a little technical, but definitely doable.
Also, make sure your Mac server's operating system is kept up to date. Apple regularly releases updates that can improve network performance and security. While an update might occasionally change a setting, it's generally better to stay current. This helps ensure your Mac is running smoothly and can handle the demands of your RemoteIoT system effectively. It's a simple maintenance step, really, but an important one.
Are There Other Ways to Connect RemoteIoT?
Yes, besides directly opening ports, there are other methods people use to get their RemoteIoT systems talking to the outside world. These methods can sometimes offer more security or be simpler to set up, depending on your specific needs and comfort level with network adjustments. It's good to know your options, obviously, before settling on one approach.
One common alternative is using a Virtual Private Network (VPN). You could set up a VPN server on your Mac or router. Then, when you're away from home, you connect your phone or laptop to your home VPN. This creates a secure tunnel, making it seem like your device is actually on your home network. So, you can access your RemoteIoT devices as if you were sitting right there. This is a pretty secure way to do it, honestly, as all your traffic is encrypted.
Another option for some RemoteIoT systems is using cloud-based services. Many IoT platforms offer their own cloud components. Your devices connect to the cloud service, and then you access the cloud service from anywhere. This means you don't have to open any ports on your firewall, as the devices are making outgoing connections to the cloud, which firewalls usually allow. This can be much simpler for many people, you know, as it moves the connection burden away from your home network.
Some RemoteIoT devices or software might also use what's called "UPnP" (Universal Plug and Play) or "NAT-PMP" (NAT Port Mapping Protocol) to automatically open ports on your router. While convenient, these protocols can sometimes be less secure because they open ports without you manually approving each one. It's something to be aware of, definitely, and often better to disable if you prefer manual control over your firewall rules.
Considering different methods to use remoteiot behind firewall using mac server
When thinking about how to use remoteiot behind firewall using mac server, the choice of connection method really depends on your comfort with network settings and your security preferences. Port forwarding is a direct approach, but it requires careful setup. It's like building a custom door for your specific needs. It works well if you have a clear idea of what ports are needed and want direct control over them, too.
Using a VPN, on the other hand, creates a private, secure connection back to your home network. This means you don't need to open any public-facing ports for your RemoteIoT devices themselves. Instead, you just access them as if you were home. This method is generally considered more secure, as it limits the exposure of your home network to the internet. It's a bit more involved to set up initially, but it offers a lot of peace of mind, obviously.
Cloud-based IoT platforms simplify things a lot for the home user. Your devices talk to the cloud, and you talk to the cloud. The cloud service acts as the middleman. This completely bypasses the need for port forwarding or VPNs for direct device access. It's pretty user-friendly, you know, especially for those who don't want to get into router settings. The downside is that you rely on a third-party service, which might have its own costs or privacy considerations.
Each method has its good points and its less good points. It's worth considering which one fits your particular situation best. For some, the simplicity of a cloud service is perfect. For others, the control and security of a VPN or direct port forwarding are preferred. It's about finding the balance that works for you and your connected home. Just pick the one that feels right, basically.
What If Things Don't Work?
It's totally normal for things not to work perfectly on the first try when you're dealing with network settings and firewalls. Don't get discouraged! There are usually some simple steps you can take to figure out what's going on. It's just like troubleshooting any other piece of technology, really, by going through things step by step.
The first thing to check is often the simplest: double-check all your settings. Did you type the correct IP address? Are the port numbers exactly right? Is the protocol (TCP/UDP) selected correctly? A tiny typo can stop everything from working. This is a very common mistake, you know, so it's always worth a quick look.
Make sure your Mac server is actually running the RemoteIoT software and that it's not crashed or paused. Sometimes, a simple restart of the application or even the Mac server itself can clear up temporary glitches. It's a bit like giving something a fresh start when it's acting funny, obviously.
Also, check your internet connection. Is your router online? Can your Mac server access the internet? If your basic internet connection isn't working, then no amount of firewall tweaking will help your RemoteIoT communicate with the outside world. A quick check of other devices on your network can confirm this. This is a pretty fundamental check, actually.
Simple checks for how to use remoteiot behind firewall using mac server
When you're